GraphFuzz使用说明 1. 概述
GraphFuzz是一个用于构建结构感知、库API模糊器的实验性框架
论文:
《GraphFuzz: Library API Fuzzing with Lifetime-aware Dataflow Graphs》
GraphFuzz包含:
gfuzz:命令行工具用来合成harnesslibgraphfuzz:一个运行时图变异引擎
文档:hgarrereyn.github.io/GraphFuzz
2. 工作流程
需要创建一个模式(**schema**)来描述目标库API
模式使用人可读的TAML格式编写,并包含一系列需要进行模糊测试的函数、类和结构体
schema.yaml :
1
2
3
4
5
6
7
8
9
10
Foo: methods: - Foo() - ~Foo() - void foo(int x, int y, float z) Bar: methods: - Bar(Foo *, int) - ~Bar() - void bar(int x)
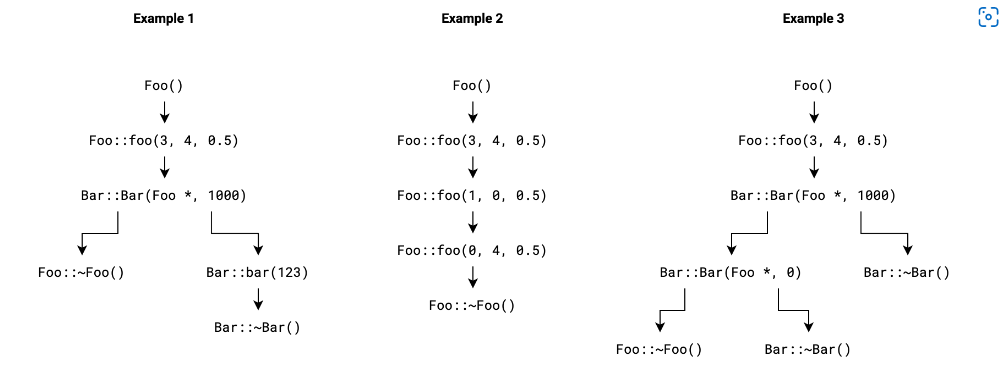
在运行时,GraphFuzz将使用不同顺序和不同的参数调用库的API以生成测试用例。最重要的是,GraphFuzz将明确跟踪目标的生命周期,并确保所有测试用例都遵守由模式定义的API规范
1
2
3
4
5
6
7
8
9
10
11
12
13
14
15
16
17
18
19
20
21
22
23
24
{ new Foo ();foo (3 , 4 , 0.5 );new Bar (v0, 1000 );bar (123 );new Foo ();foo (3 , 4 , 0.5 );foo (1 , 0 , 0.5 );foo (0 , 4 , 0.5 );new Foo ();foo (3 , 4 , 0.5 );new Bar (v0, 1000 );new Bar (v0, 0 );
上述的测试用例将表示为C++源代码。但在GraphFuzz内部,每个测试用例表示为一个数据流图 ,该数据流图的顶点表示为函数,边表示为对象之间的依赖。通过这种方式,GraphFuzz无需代码分析或重编译便可执行测试用例;相反,它动态遍历每一个图,调用每个顶点的一个端点
3. 安装GraphFuzz
1
2
3
4
$ git clone https://github.com/ForAllSecure/GraphFuzz.gitexport PATH=$PATH : ** the root path to poetry ** (e.g. /home/chan/.local/bin)
1⃣ libgraphfuzz:
libgraphfuzz是链接到你的模糊器harness的一个运行时图变异库,其用C++编写并使用标准的CMake进行构建:
1
2
3
4
5
6
$ cd GraphFuzzmkdir buildcd build
2⃣ gfuzz:
gfuzz是一个python命令行工具,用来构建harness文件并执行各种各样其他的功能(如图最小化)。其使用Python编写,使用Poetry来构建系统:
1
2
3
4
5
$ cd .. && cd cliexport > dist/requirements.txt
4. 基本用法 1 2 3 4 5 $ sudo apt-get install docker-ce docker-ce-cli containerd.iocd .. && cd experiments
hello_graphfuzz是一个简单测试项目,其中包含一个简单的C++目标文件lib.h、一个模式配置文件schema.yaml一个简单的C++目标文件lib.h:
1 2 3 4 5 6 7 8 9 10 11 12 13 14 15 16 17 18 19 20 21 22 23 24 #include <cstring> #include <vector> class Foo {public :Foo (): buffer (0 ) {}void write (char val) push_back (val);void check () if (buffer.size () >= 4 && \0 ] == 'F' && \1 ] == 'U' && \2 ] == 'Z' && \3 ] == 'Z' private :char > buffer;
在这个目标中,无法创建使用标准LLVMFuzzerTestOneInput类型的单个函数的harness。但你可以按照如下的方法构造一个事实上的API模糊器:
1 2 3 4 5 6 7 int LLVMFuzzerTestOneInput (const char *Data, size_t Size) for (int i = 0 ; i < Size; ++i) {write (Data[i]);check ();
上述类型的harness构造需要一些关于API的域知识,但对模糊器的搜索空间进行了限制。例如,如果一个bug需要在Foo::check之后调用Foo::write或多次调用Foo::check才能触发,那该如何操作?因此上述基于标准LLVMFuzzerTestOneInput存在局限性 ,主要的问题是其调用序列不变,因此不能触发更深层次的漏洞。随着API surface的扩大,函数的交互方式也呈指数级增加,生成这些“事实上”的harness变得更加困难。
在GraphFuzz中,一个驱动见解是使模糊器引擎根据覆盖率引导变异自行发现API使用模式 :通过定义一个模式,描述我们想要模糊测试的所有API端点,让模糊器构建测试用例。
schema.yaml:
1 2 3 4 5 6 7 8 9 Foo: type: struct name: Foo headers: [lib.h ]methods: - Foo() - ~Foo() - void write(char val) - void check()
接下来,我们使用gfuzz工具去合成实际的C++ harness文件:
1 2
这将会产生3个文件:
fuzz_exec.cpp:主模糊器harnessfuzz_write.cpp:一个镜像harness,用于将数据流图转化为源代码schema.json:在运行时被GraphFuzz所使用的类型元数据
:happy: 生成文件内容详见附录
1 $ clang++ -o fuzz_exec fuzz_exec.cpp -fsanitize=fuzzer -lprotobuf -lgraphfuzz
注意:GraphFuzz通过hook的方式使用libFuzzer,因此我们可以使用libFuzzer的功能如 user_value_profile, fork, dict 等。
1 ./fuzz_exec -use_value_profile=1
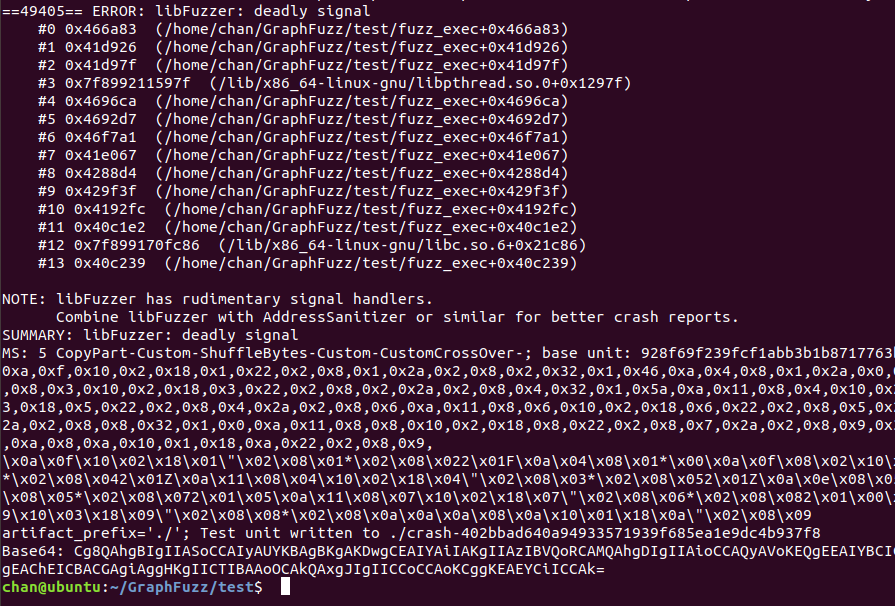
运行结果:
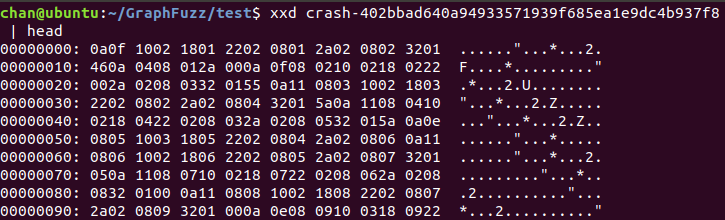
每个测试用例文件表示一个序列化的数据流图,因此我们查看crash是不可读的:
为了使其可读,我们使用fuzz_write harness从图中合成源代码:
1 $ clang++ -o fuzz_write fuzz_write.cpp -fsanitize=fuzzer -lprotobuf -lgraphfuzz
然后运行fuzz_write来合成harness:
1 $ ./fuzz_write crash-402bbad640a94933571939f685ea1e9dc4b937f8
1 2 3 4 5 6 7 8 9 10 11 12 13 14 15 16 17 18 19 20 21 22 23 24 25 26 27 28 29 30 31 32 33 34 35 36 37 38 39 40 41 42 43 44 45 46 47 48 49 50 51 52 53 54 55 56 57 58 59 60 61 62 63 64 65 66 67 68 69 #include "lib.h" #define MAKE(t) static_cast<t *> (calloc(sizeof(t), 1)) struct GFUZZ_BUNDLE {public :void *active;void *inactive;GFUZZ_BUNDLE (void *_active, void *_inactive): active (_active), inactive (_inactive) {}#define BUNDLE(a,b) new GFUZZ_BUNDLE((void *)a, (void *)b) int main () MAKE (Foo);Foo ();write (70 ); write (85 ); write (90 ); write (90 ); check (); write (5 );write (0 );write (0 );check ();free (var_9);
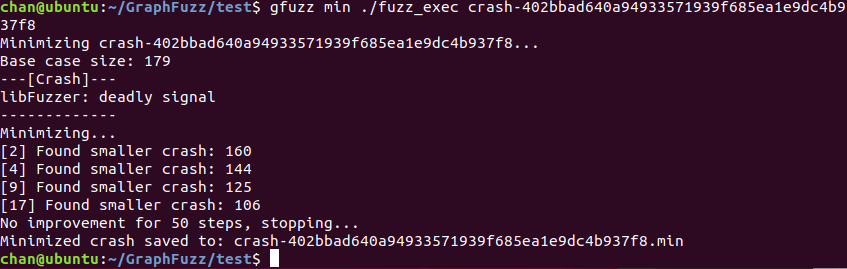
该crash在内部仍被表示为数据流图,我们可以使用同样的模糊器概念来进行图感知的最小化
📓 gfuzz的一部分
1 2
运行结果:
1 $ ./fuzz_write crash-402bbad640a94933571939f685ea1e9dc4b937f8.min
1 2 3 4 5 6 7 8 9 10 11 12 13 14 15 16 17 18 19 20 21 22 23 24 25 26 27 28 29 30 31 32 33 34 35 36 37 38 39 40 41 42 43 44 45 46 47 48 49 50 #include "lib.h" #define MAKE(t) static_cast<t *> (calloc(sizeof(t), 1)) struct GFUZZ_BUNDLE {public :void *active;void *inactive;GFUZZ_BUNDLE (void *_active, void *_inactive): active (_active), inactive (_inactive) {}#define BUNDLE(a,b) new GFUZZ_BUNDLE((void *)a, (void *)b) int main () MAKE (Foo);Foo ();write (70 ); write (85 ); write (90 ); write (90 ); check (); free (var_5);
👏 👏 👏
5. 端点
端点是一个GraphFuzz harness基本构建块(数据流图的顶点),本节主要探索完整的端点定义语法:
1 2 3 4 5 6 7 8 9 10 11 12 13 14 15 16 17 18 19 20 21 22 23 Foo: ... methods: ... - myEndpoint: inputs: ['Foo' , 'Bar' ]outputs: ['Bar' ]args: ['int' , 'char[10]' ]exec: | // Arbitrary C/C++ code here for (int i = 0; i < 10; ++i) { $a1[i] &= 0x7f; } $i1->doFunction($i0, $a0, $a1); $o0 = $i1;
可以将端点定义抽象为一个代码片段,对用法有一定的要求:
1 2 3 4 5 6 7 8 9 10 11 12 13 14 for (int i = 0 ; i < 10 ; ++i) {0x7f ;doFunction ($i0, $a0, $a1);
注:为了运行此代码,我们需要初始化多个对象,包括实时数据类型。运行此代码后,将剩下一个对象(Bar *),我们需要清理该对象
模糊测试引擎将通过调用构造必要对象并析构结果对象的其他端点来自动识别如何调用此端点
在基本用法 中,我们使用以下模式来自动生成完整的端点定义
schema.yaml:
1 2 3 4 5 6 7 8 9 Foo: type: struct name: Foo headers: [lib.h ]methods: - Foo() - ~Foo() - void write(char val) - void check()
在内部,GraphFuzz生成了一个完整的模式,如下所示:
1 2 3 4 5 6 7 8 9 10 11 12 13 14 15 16 17 18 19 20 21 22 23 24 25 26 Foo: type: struct name: Foo headers: [lib.h ]methods: - Foo(): outputs: ['Foo' ]exec: | $o0 = new Foo(); - ~Foo(): inputs: ['Foo' ]exec: | delete $i0; - void write(char val): inputs: ['Foo' ]outputs: ['Foo' ]args: ['char' ]exec: | $i0->write($a0); $o0 = $i0; - void check(): inputs: ['Foo' ]outputs: ['Foo' ]exec: | $i0->check(); $o0 = $i0;
1⃣ Foo::Foo()
1 2 3 4 - Foo(): outputs: ['Foo' ]exec: | $o0 = new Foo();
该端点无输入和上下文参数(直接省略这些字段)。因为该端点是一个构造函数,其产生一个Foo类型的输出。在输出中,我们编写输出对象的类型名称。在exec模板中,我们需要实际调用这个构造函数。因为我们指定了输出,所以我们可以访问模板变量**$o0**(第0个输出),该变量将填充为一个Foo *指针。
2⃣ Foo::~Foo()
1 2 3 4 - ~Foo(): inputs: ['Foo' ]exec: | delete $i0;
该端点是一个析构函数。为了调用析构函数,我们需要一个对象的实例;因此,我们在inputs数组中指定一个Foo对象。因为我们指定了一个输入,所以我们可以访问模板变量**$i0**(第0个输入),即一个Foo *指针。
3⃣ Foo::check()
1 2 3 4 5 6 - void check(): inputs: ['Foo' ]outputs: ['Foo' ]exec: | $i0->check(); $o0 = $i0;
该端点是一个方法调用。为了执行一个方法调用,我们需要这个对象的一个实例。在我们执行这个方法调用之后,该对象仍然有效,因此其是一个输出。我们在inputs和outputs中指定Foo对象。在我们执行模板时,我们可以访问$i0 和$o0 。当这个端点被调用时,$i0将指向一个有效的Foo对象并由我们负责填充**$o0**
4⃣ Foo::write(char)
1 2 3 4 5 6 7 - void write(char val): inputs: ['Foo' ]outputs: ['Foo' ]args: ['char' ]exec: | $i0->write($a0); $o0 = $i0;
和Foo::check()一样,该端点也是一个方法调用。但是,该方法有另外一个参数:一个char变量将传递给我们的端点方法。char是一个基本类型,默认情况下,其不会作为数据流图的一部分进行跟踪。相反,在给定图中的每个端点实例包含一个此参数的单独实例,该实例可以被模糊测试。这些上下文相关的参数被指定在args数组中。这里我们通过模板变量**$a0**(第0个参数)来指向char变量。
附录 A. 相关源代码 1 2 3 4 5 6 7 8 9 10 11 12 13 14 15 16 17 18 19 20 21 22 23 24 25 26 27 28 29 30 31 32 33 34 35 36 37 38 39 40 41 42 43 extern "C" void shim_0 (void **in_ref, void **out_ref, const char *context) MAKE (Foo);Foo ();0 ] = reinterpret_cast <void *>(_o0);extern "C" void shim_1 (void **in_ref, void **out_ref, const char *context) reinterpret_cast <Foo *>(in_ref[0 ]);free (_i0);extern "C" void shim_2 (void **in_ref, void **out_ref, const char *context) reinterpret_cast <Foo *>(in_ref[0 ]);char _a0;memcpy (&_a0, context + 0 , sizeof (char ));write (_a0);0 ] = reinterpret_cast <void *>(_o0);extern "C" void shim_3 (void **in_ref, void **out_ref, const char *context) reinterpret_cast <Foo *>(in_ref[0 ]);check ();0 ] = reinterpret_cast <void *>(_o0);
1 2 3 4 5 6 7 8 9 10 11 12 13 14 15 16 17 18 19 20 21 22 23 24 25 26 27 28 29 30 31 32 33 34 35 36 37 38 39 40 41 42 43 44 45 46 47 48 49 50 51 52 53 54 55 56 extern "C" void shim_0 (void **in_ref, void **out_ref, const char *context) unsigned long _o0 = CURR_ID++;" Foo *var_" << _o0 << ";" << std::endl;" {" << std::endl;" " << "var_" << _o0 << " = MAKE(Foo);\n Foo ref = Foo();\n *" << "var_" << _o0 << " = ref;" << std::endl;0 ] = reinterpret_cast <void *>(_o0);" }" << std::endl;extern "C" void shim_1 (void **in_ref, void **out_ref, const char *context) unsigned long _i0 = reinterpret_cast <unsigned long >(in_ref[0 ]);" {" << std::endl;" free(" << "var_" << _i0 << ");" << std::endl;" }" << std::endl;extern "C" void shim_2 (void **in_ref, void **out_ref, const char *context) unsigned long _i0 = reinterpret_cast <unsigned long >(in_ref[0 ]);char _a0;memcpy (&_a0, context + 0 , sizeof (char ));unsigned long _o0 = CURR_ID++;" Foo *var_" << _o0 << ";" << std::endl;" {" << std::endl;" " << "var_" << _i0 << "->write(" << (int )_a0 << ");\n " << "var_" << _o0 << " = " << "var_" << _i0 << ";" << std::endl;0 ] = reinterpret_cast <void *>(_o0);" }" << std::endl;extern "C" void shim_3 (void **in_ref, void **out_ref, const char *context) unsigned long _i0 = reinterpret_cast <unsigned long >(in_ref[0 ]);unsigned long _o0 = CURR_ID++;" Foo *var_" << _o0 << ";" << std::endl;" {" << std::endl;" " << "var_" << _i0 << "->check();\n " << "var_" << _o0 << " = " << "var_" << _i0 << ";" << std::endl;0 ] = reinterpret_cast <void *>(_o0);" }" << std::endl;
1 2 3 4 5 6 7 8 9 10 11 12 13 14 15 16 17 18 19 20 21 22 23 24 25 26 27 { "types" : [ { "id" : 0 , "name" : "Foo" } ] , "scopes" : [ { "name" : "(auto) Foo::Foo();" , "inputs" : [ ] , "outputs" : [ 0 ] , "context" : 0 } , { "name" : "(auto) Foo::~Foo();" , "inputs" : [ 0 ] , "outputs" : [ ] , "context" : 0 } , { "name" : "(auto) Foo::void write(char val);" , "inputs" : [ 0 ] , "outputs" : [ 0 ] , "context" : 1 } , { "name" : "(auto) Foo::void check();" , "inputs" : [ 0 ] , "outputs" : [ 0 ] , "context" : 0 } ] }
B. 模式格式(⭐
一个 GraphFuzz 模式是用 YAML 编写的模式对象的键值映射:
1 2 3 4 5 6 7 8 9 object1: type: ... name: object1 ... object2: type: ... name: object2 ... ...
a. 可用对象 结构体/类 1 2 3 4 5 6 7 8 9 struct_Foo: type: struct name: Foo headers: ['foo.h' ]methods: - void Foo() - void ~Foo() static_methods: - Foo * MakeFoo(int)
属性:
name
type
default value
info
typestring-
struct 或 class
namestring-
类的名字(如 Foo) 或一个模板实例的名字(如 Foo<int>).
methodsList[endpoint][]实例方法的列表(签名或端点对象)
static_methodsList[endpoint][]静态方法的列表(签名或端点对象)
headersList[string][]包含所有封闭方法定义的C++头文件列表
c_headersList[string][]包含所有封闭方法定义的C头文件列表
default_destructorboolfalse如果为 true, 则添加一个默认的析构函数端点(如 void ~Foo())
alloc_with_newboolfalse如果为 true, 通过Foo *f = new Foo() 来调用构造函数,而不是执行本地分配并使用一个复制构造函数
枚举 1 2 3 4 5 6 7 8 enum_Options: type: enum name: Options headers: ['options.h' ]values: - OptA - OptB - OptC
属性:
name
type
default value
info
typestring-
enum
namestring-
枚举名称(如Options)
headersList[string][]该枚举所需的C++头文件
c_headersList[string][]该枚举所需的C头文件
valuesList[string][]枚举值列表
Typedef 1 2 3 4 5 6 7 8 typedef_foo: type: typedef name: MyFoo headers: ['foo.h' ]value: float
属性:
name
type
default value
info
typestring-
typedef
namestring-
新创建类型的名称(如 MyFoo)
headersList[string][]使用该类型所需的C++头文件
c_headersList[string][]使用该类型所需的C头文件
valuestring''类型的值
Simple(基本数据类型) 1 2 3 4 simple_float: type: simple name: float context_size: 4
属性:
name
type
default value
info
typestring-
simple
namestring-
内置类型的名称(如 float)
context_sizeint0该类型字节大小
b. 端点定义
端点有两种指定方式:
(自动)提供C/C++函数签名
(手动)提供端点定义对象
自动生成端点 1 - void doBar(Bar *, int)
GraphFuzz使用下面的逻辑来决定如何解释端点签名(类似于正则匹配):
condition
result
in methods and matches void <name>(...)?
standard constructor
in methods and matches void ~<name>(...)?
destructor
in methods?
instance method
in static_methods and return type is <name> *?
static constructor
in static_methods?
static function
手动生成端点 1 2 3 4 5 6 7 - my_endpoint: inputs: ['Foo' , 'Bar' ]outputs: ['Bar' ]args: ['int' ]exec: | $i0->doFoo($i1, $a0); $o0 = $i1;
属性:
name
type
default value
info
inputsList[string][]实时输入类型的列表
outputsList[string][]实时输出类型的列表
argsList[string][]上下文参数列表。这里可以使用长度固定的数组,如 int[10] 或 char[256]。
execstring''执行模板 (C/C++)。 $(i/o/a)N 宏分别引用第N个输入/输出/参数对象